 Description of PERC Subsystem 1 Controllers
 Dell OpenManage™ Array Manager 3.4
Description of PERC Subsystem 1 Controllers
General Channel/Backplane Commands
This chapter describes how to configure and manage arrays attached to PERC subsystem 1 controllers. You can display your system's PERC subsystem 1 controllers in the Array Manager tree view by doing the following:
The following controllers are supported by the PERC subsystem 1:
The PERC 2/SC, 2/DC, 3/SC, 3/DCL, 3/DC, 3/QC, 4/SC, 4/DC and 4/Di controllers are high-performance intelligent PCI-to-SCSI host adapters with RAID control capabilities.
The CERC ATA100/4ch controller is a PCI-to-IDE host adapter with RAID control capabilities. Each channel on the CERC ATA100/4ch supports 100 MB data transfer. Each channel on this controller supports a single device.
Each channel on the PERC 2/SC and PERC 2/DC controllers supports SCSI data transfer rates of up to 80 MB per second per channel and up to 160 MB per second per channel for the PERC 3/SC, 3/DCL, 3/DC, 3/QC, and 4/Di controllers. The channels on these controllers also support up to 15 devices.
Each channel on the PERC 4/SC and 4/DC controllers supports SCSI data transfer rates of up to 320 MB.
The PERC 4/IM controller provides integrated mirroring. This controller supports SCSI data transfer rates of up to 320 MB per second. See Integrated Mirroring for more information.
For more information about specific controller features, refer to the hardware manual that came with the controller.
The following features are available on the PERC 2/SC, 2/DC, 3/SC, 3/DCL, 3/DC, 3/QC, 4/SC, 4/DC, 4/Di, 4/IM, and CERC ATA100/4ch controllers.
 |
Note Supported features may vary from controller to controller. |
The following table indicates the RAID levels supported by the PERC 2/SC, 2/DC, 3/SC, 3/DCL, 3/DC, 3/QC, 4/SC, 4/DC, 4/Di, and CERC ATA100/4ch Controllers. Refer to the "comments" column for information on how a controller implements a particular RAID level.
When creating virtual disks on the PERC 2/SC, 2/DC, 3/SC, 3/DCL, 3/DC, 3/QC, and 4/Di controllers, there are limitations on the number of array disks that can be included in the virtual disk. When creating a virtual disk, these controllers support a certain number of stripes and spans (methods for combining the storage on array disks). Because the number of total stripes and spans is limited, the number of array disks that can be used is also limited. The limitations on stripes and spans affect the possibilities for concatenation and RAID levels as follows:
In the case of RAID 50, you can use a greater number of array disks than is possible for the other RAID levels. The number of channels on the controller, however, imposes limitations on how many array disks can be included in a virtual disk when using RAID 50. This is because only a limited number of array disks can be physically attached to the controller.
For more information on storage concepts used in this section, see Concatenation (Spanned Volume) and RAID.
The following table describes the specific limitations for the PERC 2/SC, 2/DC, 3/SC, 3/DCL, 3/DC, 3/QC, 4/Di, and CERC ATA100/4ch controllers.
For more information on concatenation and RAID levels, see the following:
|
Note In addition to this online help, you should review the hardware documentation that is provided with the controllers. Reviewing the hardware documentation along with this online help may provide a fuller understanding of the controller limitations. |
You can create a maximum of 8 virtual disks on one PERC 2/SC or PERC 2/DC controller and a maximum of 4 virtual disks on one CERC ATA100/4ch controller. On the PERC 3/SC, 3/DCL, 3/DC, 3/QC, 4/SC, 4/DC, and 4/Di controllers, you can create a maximum of 40 virtual disks.
Array Manager supports PERC 3/DC controllers that have Microsoft Cluster Server (MSCS) enabled.
|
Note Dell does not provide cluster support on NetWare 6.x. |
After a failover of cluster resources, it is necessary to perform a rescan operation in order for Array Manager to display the most up-to-date information about shared resources. You can specify that a rescan automatically be performed when the Array Manager console is launched by selecting the Rescan at startup check box on the Quick Access window.
If a failover occurs while the Array Manager console is displayed, you can perform a rescan by selecting Rescan from the View pull-down menu or using the Rescan button on the Array Manager toolbar.
If you are using a PERC 3/DC controller in a cluster configuration, you must shut down and power off the other systems in the cluster before creating or deleting the virtual disk. The following procedure describes the sequence of actions required to create or delete a virtual disk from a cluster-enabled controller. For the purposes of this procedure, the system on which you are deleting the virtual disk is identified as "system A" and the other system in the cluster is identified as "system B."
There is a Rescan at startup check box at the bottom of the Quick Access window that is designed for use with cluster-enabled controllers. When the Rescan at startup check box is selected, Array Manager automatically performs a rescan when the Array Manager console is launched. It is recommended that this check box be selected on a system with a cluster-enabled PERC 3/DC controller.
You can display the Quick Access Window by selecting Quick Access Window from the View pull-down menu.
When downloading firmware to a clustered controller, it is recommended that you shut down the other systems in the cluster first. When restarted, the other systems in the cluster should be able to see the firmware updates that you have applied.
If, however, you have downloaded firmware to a controller without first shutting down the other systems in the cluster, you may find that the other systems cannot see the firmware update until you restart the disk management service on those systems. For example, if you download firmware onto system A, and system B cannot see the firmware update, then restart the disk management service on system B.
Integrated mirroring on the PERC 4/IM controller enables you to mirror a disk drive that resides internally in the server. This feature can be used to mirror a system's boot drive, ensuring that the system remains running in the event of a boot drive failure. The PERC 4/IM controller firmware maintains the mirrored data on both drives so that the system's CPU is not burdened with the extra processing required to maintain the mirrored data.
When implementing mirroring on a PERC 4/IM controller, you create a virtual disk from hard disks. A hard disk is a physical disk that is directly visible to the operating system. Unlike creating a virtual disk on other controllers, the PERC 4/IM controller is able to implement a mirror for a hard disk that already contains data. The data is then copied to the mirror. Any data previously residing on the mirror is overwritten.
Once you have created the integrated mirror, the operating system sees the mirror as a virtual disk and a virtual disk object for the mirror is displayed in the Array Manager tree view. Expanding the virtual disks object displays the disks included in the mirror. These disks are now labeled "array disks" since they are part of a virtual disk and no longer individually visible to the operating system.
For more information on implementing integrated mirroring, see Creating Virtual Disks on a PERC 4/IM Controller -- Integrated Mirroring.
A hot spare is an unused backup array disk that is part of the array group. Hot spares remain in standby mode. When an array disk that is used in a virtual disk fails, the assigned hot spare is activated to replace the failed array disk without interrupting the system or requiring your intervention. When a hot spare is activated, it rebuilds the data for all redundant virtual disks that were using the failed array disk. If a virtual disk using the failed array disk is not redundant, then the data is permanently lost without any method (unless you have a backup) to restore the data.
There are two procedures for creating different types of hot spares:
When an array disk fails, the entire array disk is rebuilt onto the hot spare. The required size of the hot spare, however, varies depending on how the virtual disks are configured on the array disks.
When using the Configure Dedicated Hot Spare procedure, the disk configured as a dedicated hot spare must be able to replace the portion of a virtual disk that resides on any array disk included in the virtual disk. The array disks included in the virtual disk may be of different sizes. The dedicated hot spare, however, only needs to be the same size (or larger) as the smallest array disk included in the virtual disk. For example, consider a virtual disk that resides on three array disks that are 8MB, 8MB, and 4MB in size. The virtual disk is striped across the three array disks. Because the virtual disk is divided in equal parts across the array disks, no portion of the virtual disk can be larger than the smallest array disk - in this case, 4MB. For this reason, the dedicated hot spare only needs to be 4MB. The same is true when mirroring instead of striping is used. If the virtual disk is mirrored on two array disks, one of which is 12 MB and the other 20MB, the dedicated hot spare only needs to be 12MB. This is because the portion of the virtual disk residing on either array disk cannot be greater than 12MB.
|
Note The Configure Dedicated Hot Spare command is not available on the PERC 2/SC and PERC 2/DC controllers. |
A global hot spare acts as a backup for any physical disk in an array. There may be several virtual disks residing on these array (physical) disks. The global hot spare needs to be big enough to rebuild the largest portion of any virtual disk residing on the array. For example, there may be two virtual disks residing on the array. The first virtual disk is mirrored with 8MB on each of two 12MB array disks. The second virtual disk is striped with 4MB strips on each of three 20MB array disks. Because there is at most 8MB of a virtual disk residing on any array disk, the global hot spare only needs to be 8MB.
Working with these controllers requires an understanding of the Array Manager storage model, which represents the Array Manager storage objects in an object hierarchy. Each object has a set of attributes and operations associated with it. Attributes describe the properties of the object, and operations allow you to create new objects and modify existing object attributes. See The Array Manager Storage Model section in the Storage Management Concepts chapter for more information about the Array Manager storage model.
Unless otherwise stated, each operation described in this chapter is available on each controller type listed above. Operations that are inactive (dimmed) in the console are not supported or not available at that time. To view attributes or to perform operations, right-click a given storage object. A context menu will appear with a list of commands available, including a Properties command.
Because the controllers in each subsystem support different features, the objects in the expanded tree view may vary for each subsystem. For example, the PERC subsystem 1 does not support tape devices or CDROMs. Therefore, the PERC subsystem 1 does not have a Tape or CDROM object in the tree view.
Array Manager allows you to create virtual disks, which are logical disks that can be created from one or more physical disks (known as array disks). The logical disks can have RAID layouts, which let you to manage your storage more efficiently. Once a virtual disk is created and a rescan is done, the Windows operating system sees the virtual disk as if it were a physical disk. The topics in this section are:
See also the section in this chapter on array disks, Array and Hard Disk Commands.
Creating virtual disks is the first step in configuring your system for improved system management, as well as for software RAID layouts.
In addition to the considerations described in this section, you should also be aware of the controller limitations described in Controller Limitations and RAID Configuration.
Be aware that the following considerations apply when creating virtual disks:
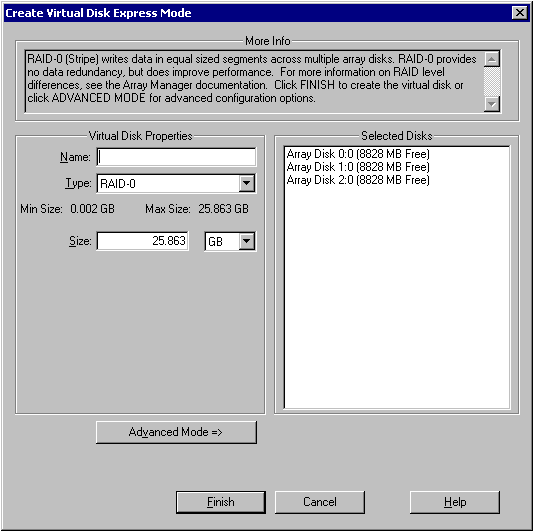
The Create Virtual Disk Wizard - Express Mode
Express Mode calculates an appropriate virtual disk layout based on the available space and controller considerations. Using Express Mode, you can quickly create a virtual disk using recommended selections.
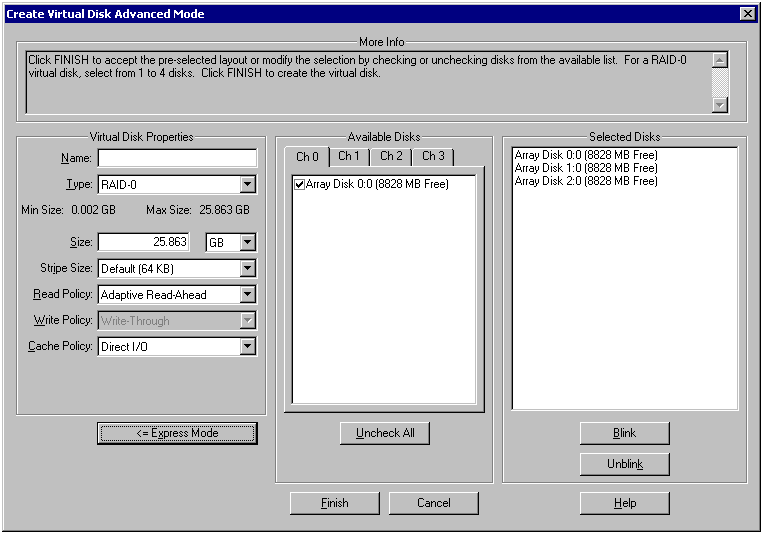
The Create Virtual Disk Wizard - Advanced Mode
Advanced Mode allows you to specify the read, write, and cache policy for the virtual disk. You can also select the array disks and the controller channel to be used. You need a good knowledge of RAID levels and hardware to use this mode.
|
Note Write-through caching is the default write policy setting when cluster mode is enabled. In cluster mode, the PERC 3/DC controllers only allow write-through caching. |
For more information on read, write, and cache policies, see Understanding Read, Write, and Cache Policy.
When using Express Mode, the wizard selects disks for you depending on the RAID level you selected and on the controller. When using Advanced Mode, the wizard displays the disks that you selected from the Available Disks section of Advanced Mode. Use the Blink and Unblink buttons to identify which disks are selected by blinking their LED display.
When using Advanced Mode, you can select the disks to be used from the Available Disks tabs. These tabs indicate the disks attached to each controller channel that are available depending on the RAID level you selected and the controller.
If the newly created virtual disk does not appear under Disks in the tree view, then perform a rescan by selecting Rescan from the View pull-down menu. Rescan forces the Array Manager software to locate and query all the objects in the system. This can take several minutes if there are numerous disks on the system.
When initializing is complete, the virtual disk appears in the tree view of the Array Manager console. Each virtual disk is automatically mapped to a Windows disk. For example, if Virtual disk 0 is mapped to Windows Disk 0, the Array Manager console will display Virtual disk 0 as "Virtual Disk 0 (Disk 0)," and the Windows disk 0 as "Disk 0 (Virtual Disk 0)."
If a virtual disk is not mapped to a Windows disk, reboot the system.
When a virtual disk is created with PERC 2/SC, 2/DC, 3/SC, 3/DCL, 3/DC, 3/QC, 4/SC, 4/DC, 4/Di, and CERC ATA100/4ch controllers, a write signature is not automatically written to the disk. Windows requires a write signature on virtual disks. For instructions on writing a disk signature, see the section Write a Disk Signature in the Disk Management chapter.
Use this procedure to delete virtual disks on PERC 2/SC, 2/DC, 3/SC, 3/DCL, 3/DC, 3/QC, 4/SC, 4/DC, 4/Di, and CERC ATA100/4ch controllers.

|
Caution All data (including file systems, volumes, Windows disks) on the virtual disk is lost when the disk is deleted. |
Because of PERC 2/SC and 2/DC controller hardware constraints, virtual disks must be deleted in the reverse order of their creation. In other words, the last disk that you created must be deleted first.
There are particular considerations for deleting a virtual disk from a cluster-enabled controller. Review the Creating and Deleting Virtual Disks on Cluster-enabled Controllers section before attempting to delete the virtual disk.
If the disk you are deleting was not the last one created, a message may display that asks you to delete the most recently created virtual disk first.
|
Note If you delete a virtual disk and immediately create a new virtual disk with all the same characteristics as the one that was deleted, the controller will recognize the data as if the first virtual disk were never deleted. In this situation, if you don't want the old data after recreating a new virtual disk, reinitialize the virtual disk. |
This section summarizes how you can change the virtual disk configuration by using the following commands:
|
Note You can also change the cache policy of a virtual disk by using the command Change Policy, which is described in the next section. |
Use this function to add array disks to a virtual disk. You can also change the virtual disk's RAID level.
|
Note If you add a member to a virtual disk that shares array disk storage with another virtual disk, you may not be able to create or delete virtual disks on the controller. Whenever you create a virtual disk that you plan to expand later with the Add Member command, it is recommended that you use the entire capacity of its member array disks. |
Add Member shows progress information in the right pane. To view the progress, click the parent of the virtual disk. The status of the virtual disk will be Reconstructing, and progress information will display until the Add Member operation is finished. At the end of the operation, the Type category shows the changed RAID level, if the RAID level was changed.
Use the Transform Type function to change the RAID level or stripe size of a virtual disk without adding or removing disks. The following is a list of supported RAID level migrations:
When creating a virtual disk, you specify the read, write, and cache policies for the virtual disk. The following describes how each of these policies functions.
The read policies indicate whether or not the controller should read sequential sectors of the logical drive when seeking data. The read policies are as follows:
The write policies specify whether the controller sends a write-request completion signal as soon as the data is in the cache or after it has been written to disk. The write policies are as follows:
|
Note Write-through caching is the default write policy setting when cluster mode is enabled. In cluster mode, the PERC 3/DC controllers only allow write-through caching. |
The Direct I/O and Cache I/O cache policies apply to reads on a specific logical drive. These settings do not affect the read-ahead policy. The Direct I/O and Cache I/O cache policies are as follows:
This section describes the following commands and procedures that are used to manage virtual disks:
You may need to replace an array disk in the following situations:
The procedure for replacing the array disk is different for each of these situations.
Use one of the following procedures to replace a failed array disk that is included in a virtual disk. In these procedures, you replace the disk and then rebuild the virtual disk so that the redundant data is restored to the virtual disk.
Which procedure you use depends on whether or not you have a disk available to use as a hot spare. The following sections also include a procedure for replacing a disk that is receiving SMART alerts.
If you have a disk available to use as a hot spare:
After you complete this procedure, a rebuild is automatically initiated because a hot spare is assigned to the virtual disk.
SMART alerts are event messages predicting that a disk may fail in the near future. If an array disk is receiving SMART alerts, you should replace the disk. Use the following procedure to replace a disk receiving SMART alerts.
Use this function to change the cache policies of a virtual disk.
|
Note Write-through caching is the default write policy setting when cluster mode is enabled. In cluster mode, the PERC 3/DC controllers only allow write-through caching. |
Use this command to rename a virtual disk. Renaming a virtual disk enables you to change the virtual disk name displayed in the Array Manager tree view. The name is not changed in the BIOS, however. When changing a virtual disk name, the numbering format for the virtual disk remains unchanged.
Use this command to assign and configure a dedicated hot spare for a redundant virtual disk. If one of the array disks belonging to a redundant virtual disk fails or is removed, then the virtual disk becomes degraded. A degraded virtual disk that has a properly configured hot spare automatically rebuilds onto that hot spare.
You can configure a dedicated hot spare for redundant virtual disks using RAID 1, 10, 5, and 50.
Hot spares created with the Configure Dedicated Hot Spare command are dedicated to a virtual disk. They will only be used if an array disk in the virtual disk fails. When you dedicate a hot spare for a virtual disk, you may notice that other virtual disks are also assigned the same hot spare. This is because the dedicated hot spare applies to all virtual disks that use the same array disks as the virtual disk for which you are configuring the hot spare. The hot spare will rebuild the data for all redundant virtual disks that are using the failed array disk.
To remove the dedicated hot spare and return the array disk to its normal status, use the Remove a Dedicated Hot Spare procedure.
For more information on hot spares including size requirements, see Understanding Hot Spares.
|
Note Configuring a dedicated hot spare for a virtual disk is highly recommended. |
|
Note The configure dedicated hot spare function is not available on the PERC 2/SC and PERC 2/DC controllers. |
Use this operation to remove a dedicated hot spare from a virtual disk. This operation returns an array disk that was previously configured as a dedicated hot spare to its normal status.
|
Note When removing a hot spare that was created with the Configure Dedicated Hot Spare menu option, be aware that multiple virtual disks may be using the hot spare. This is because the hot spare applies to all virtual disks that use the same array disks as the virtual disk for which the hot spare was created. Removing a dedicated hot spare removes the hot spare from all of these virtual disks. |
This function checks mirror synchronization and rebuilds parity if necessary. You also use this function if your disk is in a degraded state. Running Check Consistency may be able to restore your disk to Ready status.
Use this procedure on any virtual disk on a PERC 2/SC, 2/DC, 3/SC, 3/DCL, 3/DC, 3/QC, 4/SC, 4/DC, 4/Di, and CERC ATA100/4ch controller system. The virtual disk will be formatted by this operation. Note that you need to initialize before using any virtual disk.
|
|
Caution Initializing a virtual disk destroys any data that is on the disk. |
The Blink Virtual Disk command allows you to locate the array disks included in a virtual disk by blinking the light-emitting diodes (LEDs) on the array disks. This command will automatically cancel after a short duration such as 30 or 60 seconds.
|
Note This procedure is not supported on the CERC ATA100/4ch or PERC 4/IM controllers. In addition, this procedure is only supported for hotswap array disks (disks that reside in a carrier). |
The Unblink Virtual Disk command allows you to cancel the Blink Virtual Disk command before the 30 or 60-second threshold has been reached.
|
Note This procedure is not supported on the CERC ATA100/4ch or PERC 4/IM controllers. In addition, this procedure is only supported for hotswap array disks (disks that reside in a carrier). |
This command brings up a window that shows the properties associated with the virtual disk.
This section describes the commands available on the Array Group context menu. These commands are:
For more information about creating virtual disks on PERC 2/SC, 2/DC, 3/SC, 3/DCL, 3/DC, 3/QC, 4/SC, 4/DC, 4/Di, and CERC ATA100/4ch controllers, see the section Creating Virtual Disks in this chapter.
For information on creating a virtual disk or an integrated mirror on a PERC 4/IM controller, see Creating Virtual Disks on a PERC 4/IM Controller -- Integrated Mirroring.
You can implement integrated mirroring on hard disks if you have a PERC 4/IM controller. When you implement integrated mirroring, you are creating a virtual disk from hard disks. Once you have done this, the virtual disk is visible to the operating system. This procedure is typically used to mirror a system's boot drive so that the system can remain operational in the event of a boot drive failure.
When completing the following procedure, you will choose a "primary disk" from a list displayed on the Create Integrated Mirror dialog. You will then select a "secondary disk" which will be the mirror for the data residing on the primary disk. Be aware that data on the secondary disk will be overwritten by the mirrored data once you create the integrated mirror or virtual disk.
For more information on integrated mirroring, see Integrated Mirroring.
For more information about creating virtual disks PERC 2/SC, 2/DC, 3/SC, 3/DCL, 3/DC, 3/QC, 4/SC, 4/DC, 4/Di, and CERC ATA100/4ch controllers, see the section Creating Virtual Disks in this chapter.
To create an integrated mirror:
Once you select a hard disk, the remaining hard disks are displayed in the Choose the secondary disk list on the right-hand side of the Create Integrated Mirror dialog.
|
|
Caution Any data residing on the disk you choose as the secondary disk or mirror will be lost when you complete this procedure. |
Use Reset Configuration to erase all information on the controller, so that you can perform a fresh configuration.
This operation will destroy any existing virtual disks on the controller. A warning is displayed before the operation is performed. You can cancel the execution at this step.
|
|
Caution Resetting a configuration permanently destroys all data on these virtual disks. If the system or boot partition resides on these virtual disks, it too will be destroyed. |
When a controller has array disks, the array disks attached to the controller can be displayed in the right pane of the Array Manager console. You can also specify that the array disks be hidden from view in the right pane.
To show or hide the display of array disks in the right pane:
When you right-click an array group object in the tree view, the pop-up menu displays either the Show Array Disks or Hide Array Disks option. Both options are not displayed on this menu at the same time. If the controller does not have array disks attached to it, then the Show Array Disks and Hide Array Disks options are not displayed.
This command brings up a window with the properties of the array group.
This section describes the following commands for working with array disks:
The Format command does a low-level formatting of the array disk. This command is only available for array disks that have an unknown state.
The Rebuild function is enabled only when a disk has failed. You can rebuild failed disks only in redundant arrays.
A global hot spare is an unused backup disk that is part of the array group. Hot spares remain in standby mode. When an array disk that is used in a virtual disk fails, the assigned hot spare is activated to replace the failed array disk without interrupting the system or requiring your intervention. When a hot spare is activated, it rebuilds the data for all redundant virtual disks that were using the failed array disk.
You can change the hot spare disk assignment by unassigning a disk and choosing another disk to assign, as needed.
For more information on hot spares, see Understanding Hot Spares.
|
Note Global hot spares must be assigned and unassigned manually. They are not assigned to specific virtual disks. The global hot spare should be big enough to rebuild the largest portion of any virtual disk residing on the array. If you want to assign a hot spare to a virtual disk (it will replace any array disk that fails in the virtual disk) then use the Configure Dedicated Hot Spare command. For more information on hot spares including size requirements, see Understanding Hot Spares. |
Use this operation to unassign the global hot spare disk.
You can set to Online only an array disk that is part of a virtual disk that has been set to Offline.
You can set to Offline only an array disk that is part of a virtual disk that has been set to Online.
Use this procedure to prepare for removing an array disk from a PERC 2/SC, 2/DC, 3/SC, 3/DCL, 3/DC, 3/QC, 4/SC, 4/DC, and 4/Di controller.
Before you remove any physical disk from an enclosure, it is recommended that you perform this operation to prevent data loss.
|
Note This procedure is not supported on the CERC ATA100/4ch controller. In addition, this procedure is only supported for hotswap array disks (disks that reside in a carrier). |
The disk that you have prepared to remove will not be displayed in the Array Manager tree view. After you have replaced this disk, it is displayed once again in the tree view.
The Blink command allows you to find an array disk within an enclosure by blinking one of the light-emitting diodes (LEDs) on the disk. This command automatically cancels after a short duration such as 30 or 60 seconds. You may want to use this command to locate an array disk that has failed.
|
Note This procedure is not supported on the CERC ATA100/4ch controller. In addition, this procedure is only supported for hotswap array disks (disks that reside in a carrier). |
The Unblink command allows you to cancel the Blink command before the 30 or 60-second threshold has been reached.
|
Note This procedure is not supported on the CERC ATA100/4ch controller. In addition, this procedure is only supported for hotswap array disks (disks that reside in a carrier). |
Use this command to display the array disk properties.
|
Note Array disks for the PERC 2/SC, 2/DC, 3/SC, 3/DCL, 3/DC, 3/QC,4/SC, 4/DC, 4/Di, and CERC ATA100/4ch controllers display Ready status if they are not part of a virtual disk and Online status if they are part of a virtual disk. |
The PERC subsystem 1 has the following commands on its context menu:
This command allows you to view a report on the PERC subsystem 1.
This command allows you to save the controller configuration.
Use this command to view the properties of the PERC subsystem 1.
By default, the operating system and server shut down when the PV220S and PV221S enclosures reach a critical temperature of 0 or 50 degrees celsius. If you have implemented Channel Redundancy on the PV220S and PV221S enclosures, however, you can specify that only the enclosure and not the operating system and server be shut down when the enclosure reaches a critical temperature of 0 or 50 degrees celsius.
|
Note You must perform this procedure on each of the server's subsystems in the Array Manager tree view in order to implement smart thermal shutdown. |
To specify that only the enclosure shut down at critical temperatures:
For more information, see:
If you have previously selected the Enable Smart Thermal Shutdown for PV22xS option, you can deselect this option and return the system to its default setting by selecting the Disable Smart Thermal Shutdown for PV22xS option. The Disable Smart Thermal Shutdown for PV22xS setting indicates that the operating system and the server will shut down when the PV220S and PV221S enclosures reach a critical temperature of 0 or 50 degrees celsius.
To specify that the operating system and server shut down at critical temperatures:
For more information, see:
This section describes the following general controller operations:
Use this operation to display new objects in the Array Manager tree view and status changes. When you do a rescan on a controller object, changes in objects below the controller in the tree view are displayed.
The following are examples of common situations where you may need to rescan the controller:
|
Note The removal of an array disk within a virtual disk is reflected immediately in the console, whereas adding an array disk to a virtual disk is reflected only by performing the Rescan operation. Displaying a status change of a virtual disk or one of its member array disks, however, requires that you do I/O on the controller on which the virtual disk resides. |
The Flush Cache option forces the PERC 2/SC, 2/DC, 3/SC, 3/DCL, 3/DC, 3/QC, 4/SC, 4/DC, 4/Di, and CERC ATA100/4ch controllers to write the contents of cache memory onto the virtual disks. You may want to use this option if you find your application or disks in an unstable condition.
Use this function to enable the controller alarm setting. When enabled, the alarm sounds in the event of a device failure.
Use this function to disable the alarm. If disabled, the alarm does not sound in the event of a device failure.
Use this function to quiet the alarm once it is sounding. Once quieted, the alarm is still enabled in the event of a future device failure.
Use this command to change the rebuild rate setting. The rebuild rate refers to how much of the system's resources are dedicated to rebuilding a failed array disk when a rebuild is necessary. A rebuild rate of 100% means that the system resources are completely dedicated to rebuilding the failed array disk. You can improve system performance during a rebuild by lowering the rebuild rate. This means that the rebuild will take longer to complete, however.
This command displays controller attributes.
The controller properties include:
This section describes the following general SCSI channel commands:
Use this operation to display new objects in the Array Manager tree view and status changes. When you do a rescan on a channel object, changes in objects below the channel in the tree view are displayed.
The following are examples of common situations where you may need to rescan the channel:
|
Note The removal of an array disk within a virtual disk is reflected immediately in the console, whereas adding an array disk to a virtual disk is reflected only by performing the Rescan operation. Displaying a status change of a virtual disk or one of its member array disks, however, requires that you do I/O on the channel on which the virtual disk resides. |
This command displays channel attributes.
The channel properties include:
This section on array and volume migration issues covers the following topics:
After some planning and preparation, it is possible to migrate array disks, virtual disks and array volumes between one controller and another, between one enclosure and another, or between one server and another. You can perform array and volume migration on PERC 2/SC, 2/DC, 3/SC, 3/DCL, 3/DC, 3/QC, 4/SC, 4/DC, 4/Di, and CERC ATA100/4ch controllers as long as the following conditions are met:
In the case where a virtual disk consists of array disks on multiple channels, each array disk must be migrated to an enclosure that is connected to the same channel number that the array disk or enclosure was originally connected to. This also prevents migration of disks on channel 1 of a PERC 2/DC controller to a PERC 2/SC controller because the PERC 2/SC has only the single channel 0.
To migrate virtual disks and volumes from one system to another, do the following:
The migration is complete. The virtual disk is now manageable through Array Manager.
Use the following procedure to enter the controller BIOS configuration screens to save the new configuration:
This will read the data on the array disks to restore the RAID controller's proprietary configuration information. Press Esc and save the new configuration when prompted.
FlexRAID virtual sizing is a feature of PERC 2/SC and PERC 2/DC controllers. When enabled, the operating system sees your virtual disk as an arbitrarily large disk, typically 1024 GB, instead of its actual size. This lets you add and remove array disks of different sizes to your configuration without having to reboot the system.
|
Note This feature is not recommended for use on a Windows 2000 or Windows Server 2003 server. It can be used on a Windows NT 4.0 server. |
This section on FlexRAID virtual sizing has the following topics:
This feature is specific to each virtual disk. You create the virtual disk first in Array Manager. Then you must exit Array Manager, reboot the system to bring up the PERC 2/SC or PERC 2/DC controller BIOS utility, and then enable virtual sizing on that virtual disk through a command in the utility.
To understand the differences between having FlexRAID virtual sizing enabled and disabled, do the following:
You will see the following differences:
In Array Manager, if you delete a virtual disk with FlexRAID virtual sizing enabled and then create another virtual disk in its place, that disk will retain the deleted disk's FlexRAID virtual sizing characteristics. For example, if you just deleted six virtual disks with virtual sizing enabled on them and create eight new ones, you should still see virtual sizing on the first six of them, but not on the last two. To avoid having retained virtual sizing characteristics from deleted virtual disks, reboot before creating new virtual disks.
FlexRAID virtual sizing does not work with dynamic volumes. On Windows NT, after upgrading a basic disk that has FlexRAID virtual sizing enabled to a dynamic disk, it will display the actual size of the disk. After reverting this disk back to basic, it will again display the virtual size of 1024 GB. On Windows 2000, you will not be able to upgrade a basic disk to dynamic if FlexRAID virtual sizing is enabled. You do not need FlexRAID virtual sizing on a Windows 2000 machine because you can add storage and create and modify dynamic volumes without having to reboot.
This section on controller issues covers the following topics:
Both Array Manager and PERC Console programs can be installed on the same server. However, only one program can be used to configure PERC 2/SC, 2/DC, 3/SC, 3/DCL, 3/DC, 3/QC, 4/SC, 4/DC, 4/Di, and CERC ATA100/4ch controllers at any given time. To maintain the integrity of storage device configuration, simultaneous use of Array Manager and PERC Console is not supported. It is strongly recommended that Array Manager and PERC Console not be used at the same time on the same server.
During a rebuild, the complete contents of an array disk are reconstructed. A rebuild operation can take place during normal operation, but it will degrade performance.
The rebuild rate is the fraction of the compute cycles dedicated to rebuilding failed array disks. The PERC 2/SC, 2/DC, 3/SC, 3/DCL, 3/DC, 3/QC, 4/SC, 4/DC, 4/Di, and CERC ATA100/4ch controller rebuild rate can be configured between 0% and 100%. At 0%, the rebuild is done only if the system is not doing anything else. At 100%, the rebuild has a higher priority than any other system activity; the system is totally dedicated to rebuilding the failed array disks.
You can reduce the rebuild rate to maintain system performance during the rebuild operation. However, a reduced rebuild rate extends the rebuild time.
Because of hardware restrictions, the PERC 2/SC, 2/DC, 3/SC, 3/DCL, 3/DC, 3/QC, 4/SC, 4/DC, 4/Di, and CERC ATA100/4ch controllers will not detect a drive status change until I/O is attempted. For example, when an unconfigured drive is removed, the controller will not detect the change until a manual rescan is done or other I/O operations are attempted.
The PERC 2/SC, 2/DC, 3/SC, 3/DCL, 3/DC, 3/QC, 4/SC, 4/DC, 4/Di, and CERC ATA100/4ch controllers will not report S.M.A.R.T. alerts for unassigned or hot spare drives.
The PERC 2/SC, 2/DC, 3/SC, 3/DCL, 3/DC, 3/QC, 4/SC, 4/DC, and 4/Di controllers support enclosure management. This section describes how enclosure management works and then details the specific enclosure management commands. The specific topics in the section are:
Array Manager enables management of various enclosures and their components. These enclosures include:
In addition to managing the array disks contained in the enclosure, you can monitor the status of the enclosure's fans, power supply, and temperature probes. You can view these components in the Array Manager tree view.
Array Manager displays the properties of the enclosure's fans, power supply, and temperature probes. Array Manager also notifies you of enclosure status changes through events that are displayed on the Events tab and logged in the Windows event log.
The following sections provide more information on the enclosure components managed by Array Manager:
When you expand the storage subsystem object in the Array Manager tree view, you see the controllers attached to the storage subsystem. The controller object expands to display the controller's channels. These channel objects are numbered in the Array Manager tree view to match the channel number that appears on the controller hardware. (See the controller's documentation for information on identifying the channels on the controller hardware.) For example, if the controller has two channels numbered 0 and 1, then the channel objects in the Array Manager tree view are named Channel 0 and Channel 1.
If the controller has a channel connected to an enclosure, then this connection is reflected in the channel name displayed in the tree view. For example, if Channel 1 is connected to an enclosure, then the channel object's name in the tree view is Enclosure (Channel 1).
Expanding the enclosure channel object displays the enclosure's fans, power supply, and temperature probes. Each of these objects expands to display the individual fans and so forth provided by the enclosure.
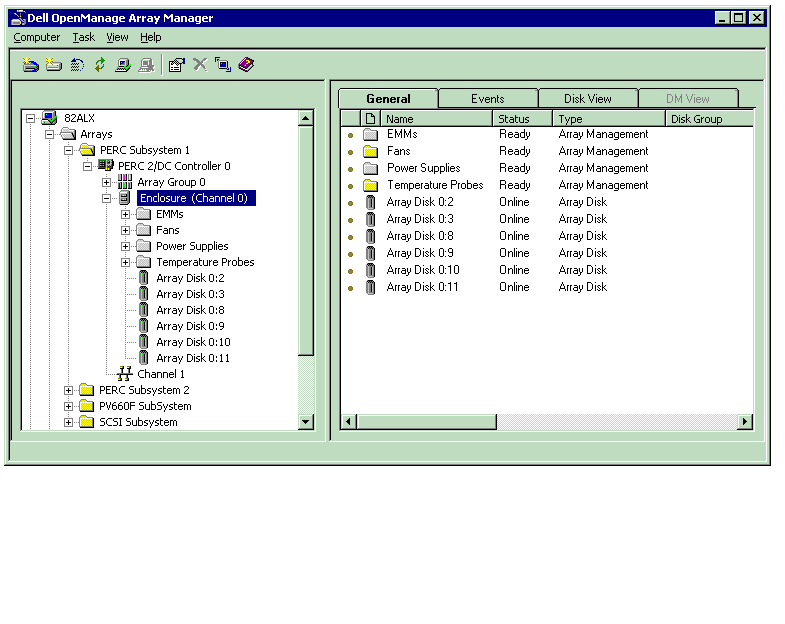
In the following graphic, the enclosure object is expanded to show the EMMs, fans, power supplies, temperature probes, and array disks included in the enclosure. Because the enclosure is connected to channel 2 of the controller, the enclosure's default name is Enclosure (Channel 2).
Enclosure Management Storage Objects
For more information on the enclosure's components, commands, and the array disks included in the enclosure, see the following sections:
Enclosure management provides a feature which automatically shuts down the operating system, the server, and the enclosure when the enclosure's temperature reaches dangerous extremes. The temperature when shutdown occurs is determined by the enclosure temperature probe's Minimum Error Threshold and the Maximum Error Threshold. These thresholds are default settings that cannot be changed.
The following enclosures:
require that the Dell OpenManage Server Agent 4.0.0 or later be installed on the managed system in order to provide full thermal shutdown functionality. When the Server Agent is installed, the operating system shuts down and the server powers off when the enclosure reaches 0 degrees celsius or 50 degrees celsius. After the server powers off, the enclosure also powers off. If the Server Agent is not installed, then only the operating system shuts down when the enclosure reaches 0 degrees celsius or 50 degrees celsius.
For the PV220S and PV221S, the operating system and server shut down at 0 degrees celsius or 50 degrees celsius if you have not implemented Channel Redundancy. If you have implemented channel redundancy (and also selected the Enable Smart Thermal Shutdown for PV22xS option), then only the enclosure shuts down at 0 degrees celsius or 50 degrees celsius. This will not result in data loss because redundant data resides on the enclosure attached to the other channel.
The PV220S and PV221S enclosures automatically shut down when their temperature reaches 55 degrees celsius. This shutdown occurs whether or not you have implemented channel redundancy or have Array Manager installed.
The Dell OpenManage Server Agent 4.0.0 or later should be installed on the managed system in order to provide a graceful shutdown of the operating system.
It is possible to create a virtual disk that uses array disks that are attached to different controller channels. The array disks may reside in an external enclosure or the backplane (internal enclosure). If the virtual disk is maintaining redundant data on different channels, then the virtual disk is channel redundant. Channel redundancy means that if one of the channels fails, data will not be lost because redundant data resides on another channel.
Channel redundancy is implemented by selecting array disks on different channels when using the Advanced Mode of the Create Virtual Disk wizard.
The following instructions describe creating a virtual disk that uses channel redundancy.
For information related to the enclosure's temperature, see the following:
The enclosure's array disks are displayed under the enclosure object in the tree view. Selecting an array disk in the tree view displays the disk's status information in the right pane. For more information on the status information displayed in the right pane, see the The Right Pane section.
If you right-click an array disk in the tree view, the Array Disks context menu is displayed. See Array and Hard Disk Commands for details on these commands.
The fans that are installed in the enclosure are displayed under the Fans object in the tree view. You can select the Fans object to display the individual fans and their status information in the right pane. You can also expand the Fans object to display the individual fans in the left pane.
If you right-click the Fans object or an individual fan, a context menu is displayed with a Properties option. For more information on fan properties, see Fan Properties.
The power supplies that are installed in the enclosure are displayed under the Power Supplies object in the tree view. You can select the Power Supplies object to display the individual power supplies and their status information in the right pane. You can also expand the Power Supplies object to display the individual power supplies in the left pane.
If you right-click the Power Supplies object or an individual power supply, a context menu is displayed with a Properties option. For more information on power supply properties, see Power Supply Properties.
The temperature probes that are installed in the enclosure are displayed under the Temperature Probes object in the tree view. You can select the Temperature Probes object to display the individual temperature probes and their status information in the right pane. The status information in the includes the current temperature in celsius and the warning and error thresholds for the temperature probe. The error threshold has a default value that cannot be changed. You can set the warning threshold, however. See Set Thresholds for Temperature for information on setting the warning threshold.
Right-clicking the temperature probes object in the left pane displays a context menu with a Properties option. You can also expand the temperature probe object to display the individual temperature probes in the tree view. Right-clicking an individual temperature probe also displays a context menu with a Properties option. This option enables you to set the minimum and maximum warning threshold for the temperature probe.
For information related to the enclosure's temperature, see the following:
The Enclosure Management Modules (EMMs) that are installed in the enclosure are displayed under the EMMs object in the tree view. You can select the EMMs object to display the individual EMM modules and their status information in the right pane. You can also expand the EMMs object to display the individual EMM modules in the left pane.
The enclosure may contain one or more EMMs. The EMM modules monitor components of the enclosure. These components include:
When the enclosure's alarm is enabled, the EMM activates the alarm when certain conditions occur. For more information on enabling the alarm and the conditions that activate the alarm, see Enable Alarm. For more information on EMMs, see the enclosure hardware documentation.
If you right-click the EMMs object or an individual enclosure management module, a context menu is displayed with a Properties option. You can view the properties of each individual EMM module to verify that all EMM modules are at the same firmware level. (All EMM modules in the enclosure should have the same version of firmware.) For more information on enclosure management module properties, see EMM Properties.
For information on downloading firmware for an EMM module, see Download Firmware.
This section describes the commands associated with the enclosure and its fans, power supplies, and temperature probes. For the commands associated with an enclosure's array disks, see Array and Hard Disk Commands.
Right-clicking an enclosure object in the tree view displays a context menu with the enclosure commands. Right-clicking the enclosure's fans, power supplies, and temperature probes also displays context menu for these components.
The commands on the enclosure's context menu can vary depending on the model of the enclosure. Enclosure context menu commands may include:
The context menu commands for fans, power supplies, and temperature are:
Use this command to rescan the enclosure. The Rescan command identifies any new array disks, fans, temperature probes, and so forth that have been added to the enclosure.
To rescan the enclosure:
Use this command to enable the alarm. When enabled, the audible alarm sounds whenever the fault LED lights. This may occur to signal events such as:
To enable the enclosure alarm:
Use this command to disable the enclosure alarm. When disabled, the alarm does not sound when the enclosure exceeds a warning threshold for temperature or experiences other error conditions such as a failed fan, power supply, or controller. If the alarm is already sounding, you can turn it off with this function.
To disable the alarm:
Use this command to specify the asset tag information and the enclosure's name. When you specify the enclosure's name, the new name is displayed for the enclosure object in the tree view. You can also use this procedure to view the service tag number for the enclosure.
To specify the asset information or view the enclosure's service tag number:
Use this command to download firmware to the enclosure. When you use this command, the firmware is downloaded to both of the EMM modules in the enclosure. This ensures that the firmware on both modules is at the same level.
This command assumes that the firmware is available on your system. If the firmware is not available on your system, it can be downloaded from the Dell support site at support.dell.com.
If the enclosure is attached to a clustered controller, it is recommended that you shut down other systems in the cluster before downloading the firmware. See Downloading Firmware and Cluster Controllers for more information.
|
Note The Download Firmware function is only available on the PV220S and PV221S enclosures. |
To download firmware to the enclosure:
Use this command to set the warning threshold for the enclosure's temperature probes.
The Temperature Probe Properties dialog displays the current status of the temperature probe as well as the default values in celsius for the minimum and maximum error thresholds. The default values for the error thresholds indicate that the enclosure has reached a dangerous temperature that may cause damage. These default values cannot be changed.
If you wish to apply your changes to all temperature probes in the enclosure, then select the Apply these values to all temperature probes in the enclosure check box.
For information related to the enclosure's temperature, see the following:
This section describes procedures commonly used in association with enclosures. For additional information on enclosure commands and properties, see Enclosure Commands and Enclosure Properties.
The enclosure procedures are as follows:
If you have not yet attached the enclosure to an open channel, you may need to identify a channel on the controller that can be used for this purpose. To identify an open channel:
After adding a new hard drive or array disk, you may find that the hard drive is not visible in the Array Manager tree view. To make the new hard drive visible in the tree view:
You can view the current status of an enclosure and its components. To view status information, select the object for which you wish to see the status in the tree view. In the right pane, the Status field indicates the current status. The possible values are:
For information on enclosure events displayed in the Array Manager event log, see Events Generated by the PERC 2/SC, 3/SC, 2/DC, 3/DCL, 3/DC, 3/QC, 4/SC, 4/DC, 4/Di, CERC ATA100/4ch and the PERC 2, 2/Si, 3/Si, and 3/Di Controllers.
To check the enclosure's temperature, select a temperature probe object in the tree view. The temperature reported by the temperature probe is displayed in celsius in the Current Value field in the right pane.
For information related to the enclosure's temperature, see the following:
The firmware for all Enclosure Management Modules (EMMs) in PV220S and PV221S enclosures should be the same version. To verify which firmware version a particular EMM module in an PV220S and PV221S enclosure has, do the following.
For information on downloading firmware for an EMM module, see Download Firmware.
To display the enclosure properties, do the following:
The enclosure properties can vary depending on the model of the enclosure. Enclosure properties may include:
For more information on joined, split, and cluster modes, see the enclosure hardware documentation. For information on how to cable the enclosure to accommodate these different modes, see the enclosure's hardware documentation.
You can also display the properties for the following enclosure components:
To display the EMM properties, right-click the EMM object in the tree view and select Properties from the context menu.
The EMM properties can vary depending on whether you select the EMMs folder in the tree view or expand the EMMs folder and select an individual EMM. The EMM properties can also vary depending on which enclosure you are using.
EMM properties may include:
To display the fan properties, right-click the fan object in the tree view and select Properties from the context menu.
The fan properties can vary depending on whether you select the Fans folder in the tree view or expand the Fans folder and select an individual fan.
Fan properties may include:
To display the power supply properties, right-click the power supply object in the tree view and select Properties from the context menu.
The power supply properties can vary depending on whether you select the Power Supplies folder in the tree view or expand the Power Supplies folder and select an individual Power Supply. Power Supply properties may include:
To display general properties for all of the temperature probes, right-click the top-level temperature probe object (the level directly under the controller object) and select Properties from the context menu. To set the temperature thresholds, see Set Thresholds for Temperature.
The temperature probe properties can vary depending on whether you select the Temperature Probes folder in the tree view or expand the Temperature Probes folder and select an individual temperature probe. Temperature probe properties may include:
For information related to the enclosure's temperature, see the following:
The terminology used in the Array Manager console differs from the terminology used in the PERC BIOS Configuration Utility. The table below shows a summary of these differences.
Naming convention differences between Array Manager and PERC BIOS Configuration Utility
|
Array Manager |
PERC BIOS Configuration Utility |
|---|---|
Controller | Adapter |
Virtual Disk | Logical Drive |
Array Disk | Physical Drive |
Add Member/ Transform Type | Reconstruct |