New Users' Guide to Computer Science Computing Resources
Creating and using SSH Keys to access SCS hosts
Software and Programs
Printing
VPN Connection
To setup a VPN connection, you will need to install the Waterloo Virtual Private Network (VPN) client.
- Go to the Waterloo VPN webpage
- Login using your WatIAM credentials
- On the left sidebar, click on AnyConnect
- Click Start AnyConnect
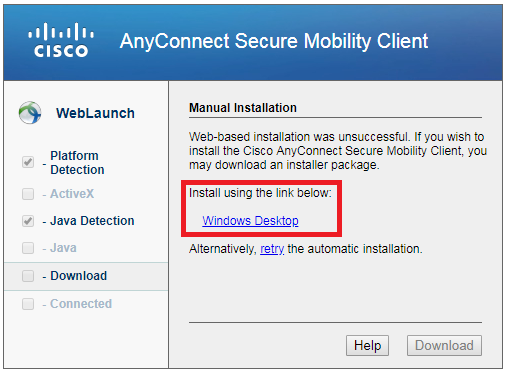
- Download the installer using the link provided under the text "Install using the link below"
- Run the installer after it has finished downloading
- You may receive a security warning asking to run the installer, click Run to proceed
- A window will pop up to install package and will require you to accept the Cisco software licence. Eventually, the installation wizard will complete: click Finish
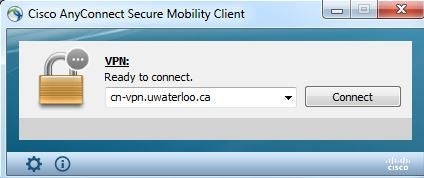
- Launch the Cisco AnyConnect VPN Client
- Enter cn-vpn.uwaterloo.ca in the address field as shown
- Enter your WatIAM credentials and click OK.
Mapping network drives
Off-campus
If you are off-campus and require to connect to your network drive, you will need to make sure you have a VPN connection setup. Please refer to the steps above.
Once you've set up the VPN connection, follow the steps below.
On-campus
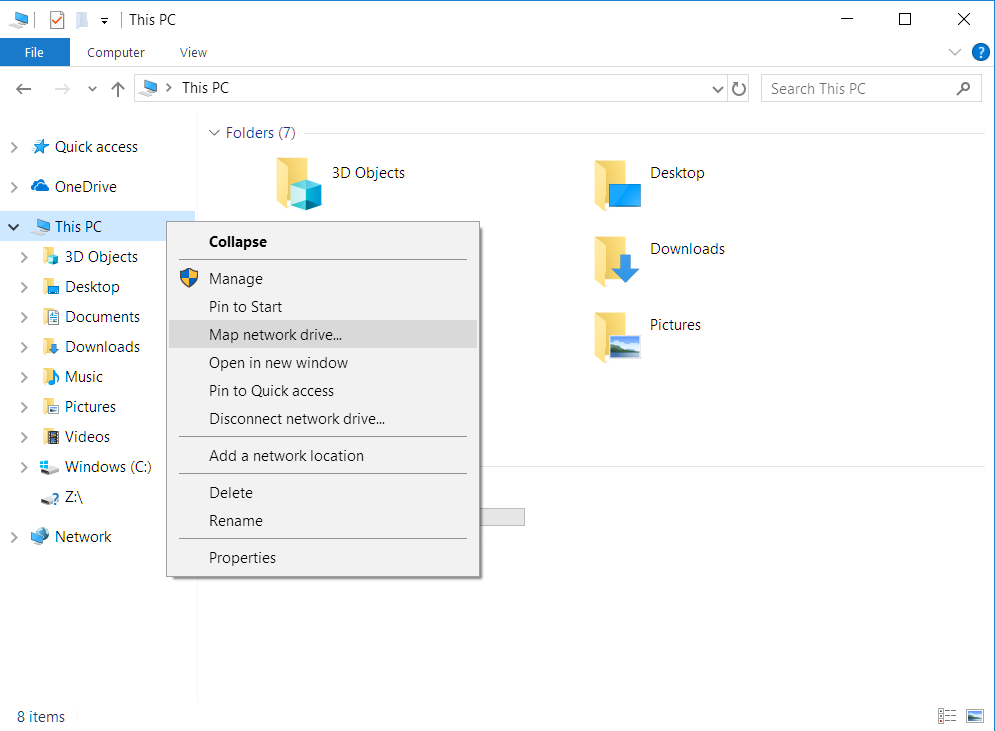
1. Windows 10
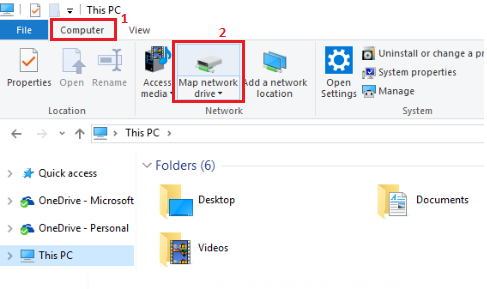
- Click the Start button, and search for This PC

- Click the Computer tab on the top, followed by the Map network drive (as shown below)
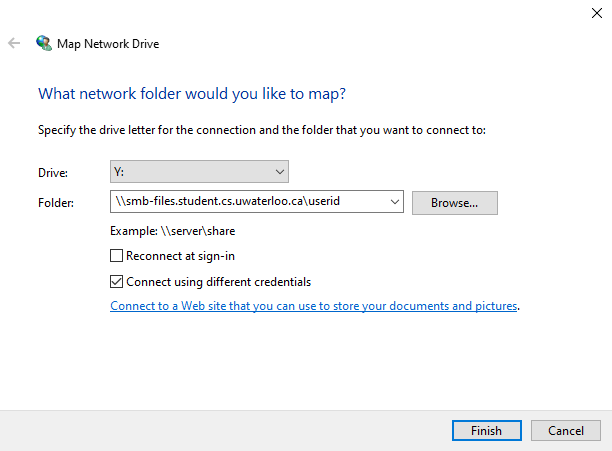
- In the Drive list, pick the letter you would like for your network drive
- In the Folder box, type \\smb-files.cs.uwaterloo.ca\userID , replace the "userID" field with your own userID
- Select the Reconnect at sign-in and Connect using different credentials boxes
- Click Finish
- You will be prompted to enter a username and password. For the username, enter it as GENERAL\userID with the same password you use to login to your machine. If you're unable to login, please contact CSCF help desk
2. Mac OSX
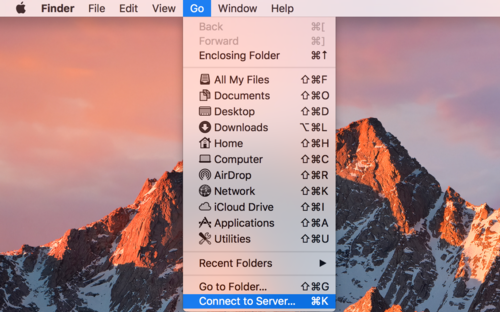
- Press Command+K on your Mac keyboard, or, Finder > Go > Connect to Server
- Enter the following address:
smb://smb-files.cs.uwaterloo.ca/userID
where the userID should be replaced with your corresponding userID - You will be prompted to enter your username and password. Select "Registered User" option and enter your username as:
GENERAL\userID
with the same password used to login to your machine. If you are unable to login, please contact the CSCF help desk.
TEACHING and/or GENERAL Environment
Remote Desktop to windows.student.cs
All students can set up a remote desktop connection to windows.student.cs.uwaterloo.ca using the Remote Desktop Connection application.
- For Windows & Mac users, launch the Remote Desktop Connection application. (You may need to download it from the App store on macOS)
- For the Computer field, enter windows.student.cs.uwaterloo.ca (as shown in the image below) and click Connect. You will be asked for your credentials, where the username will be TEACHING\userid and your TEACHING password. If you do not know your TEACHING password then you can (re)set it HERE.

Accessing the smb-files.student.cs
For Windows Users
- If you're not on UW campus, you have to first connect to the campus network using the UW Cisco AnyConnect VPN
 (download the VPN client).

- Open File Explorer. Right-click This PC. Choose Map network drive...
-
For the Folder, enter
\\smb-files.student.cs.uwaterloo.ca\useridwhere userid is you Quest userID.Check Connect using different credentials and click Finish.
- Click More choices and Use a different account.
For the username, enterTEACHING\useridwhereuseridis your Quest ID, up to 8 characters. The password is the same password you use to logon to the Macs in MC 3rd floor. You can reset your password if you don't know it.

For Mac Users
Samba lets you mount the course account as a drive/folder so that you can work with the course's files in a Finder window.
Step 1: Click on the desktop or the Finder icon in the Dock (bar at the bottom of the screen). Then in the Finder menu bar at the top of the screen, click on Go and choose "Connect to Server..."
Step 2: Use Server Address:
smb://smb-files.student.cs.uwaterloo.ca/userid
You can click the '+' button to save the address. Click Connect.
Step 3: For Name enter TEACHING\userid, where userid is your WatIAM or Quest ID, and use your student.cs password (reset password if needed). Click Connect.